Galleries
Galleries display an interactive grid of photos, drawings, or artwork. When you add images to a gallery, MapsAlive automatically creates thumbnails from each hotspot image and places them on a background. Galleries make use of photo markers to display the hotspot image thumbnails.
This section provides information about how to work with galleries. For other gallery-related topics, see:
Working with Galleries
You initiate most gallery-related tasks from the Tour Builder's Gallery menu (click below to see the menu).
Gallery menu
The Gallery menu is only enabled when a gallery page is selected in the Tour Navigator.

How to add a gallery to a tour
- Choose New > Gallery from the Tour Builder menu
- On the New Gallery Setup screen:
- Give the gallery a name or accept the default
- Choose a Popup or Tiled layout
- Click the Add Gallery button
How to delete a gallery
- Choose Gallery > Delete from the Tour Builder menu
- Click OK on the confirmation dialog. This step displays a second confirmation dialog asking if you are sure you want to delete the gallery.
- Click OK on the second confirmation dialog. The gallery is deleted from your account.
Caution
A deleted map, gallery, or data sheet, along with its hotspots, cannot be recovered. It is permanently removed from our database and cannot be restored.
How to get the highest image quality for hotspots
For the highest image quality, upload or import jpg images having the same dimensions as your tour's tiled or popup layout image area. For example, if the image area is 600 x 400, upload images that are 600 x 400. When you do this, the image MapsAlive displays will be identical to what you uploaded and its EXIF data such as a copyright notice will be preserved. If you upload an image having much larger dimensions, MapsAlive may scale the image to fit. Due to the nature of jpg images which degrade a little bit every time they are saved, a scaled image may not look quite as good as the original nor will its EXIF data be preserved.
Gallery Editor
The Gallery Editor screen displays options that let you control how a gallery’s rows and columns are laid out and how the thumbnail images are aligned within each cell of the grid. The screen also lets you specify the order from left to right, top to bottom, in which hotspot markers appear.
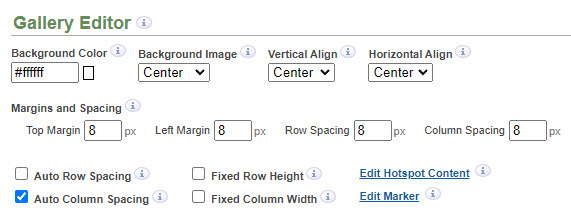
Background color or image
You can choose any solid color for your gallery background, or you can upload a background image. The background color or image that you choose will show in the gallery’s margins and the spaces between rows and columns.
How to upload a gallery background image
- Choose Gallery > Choose Background Image from the Tour Builder Menu
- On the Choose Background Image screen:
- Choose an image file and then click the Load button
You can use a repeating background image as shown below. In the screenshot, the image on the left was uploaded as the gallery's background image, and the repeat option was selected to produce the gallery background on the right.
How to make a repeating gallery background image
- Choose Gallery > Gallery Editor from the Tour Builder Menu
- On the Gallery Editor screen:
- Select Repeat from the Background Image dropdown
Image alignment
The Vertical Align and Horizontal Align dropdowns let you choose how your thumbnail images are aligned within the gallery’s cells. The size and shape of the cells are determined by the height of the rows, the width of the columns, and the spacing between rows and columns. Depending on which values you choose for those options, the cells can be square, tall, or wide. You use the alignment options when the thumbnail won’t fill the entire cell.
Row and column options
You have several options for controlling the gallery’s rows and columns.
The text box fields in the Margins and Spacing section let you control how much space appears around and between the hotspots in the gallery. When the Auto Row Spacing option is checked, the Top Margin is also used for the bottom margin and the Row Spacing value is treated as the minimum row spacing. When the Auto Column Spacing option is checked, the Left Margin is also used for the right margin and the Column Spacing value is treated as the minimum column spacing.
When you check the Auto Row Spacing and Auto Column Spacing boxes, MapsAlive will automatically lay out the rows and columns to fill the gallery area with as many markers as will fit. Any markers that won’t fit will not appear in the gallery.
When you check the Fixed Row Height and Fixed Column Width boxes, MapsAlive will calculate the row height and column width for all rows and columns based on the height of the tallest image and the width of the widest image.
Thumbnail ordering
The order in which thumbnails appear in the gallery is shown in the Hotspot Order list on the Gallery screen (below the gallery preview). The thumbnails for the hotspots listed are displayed left to right, top to bottom, in the gallery. You can change the order by using the up and down arrows or by dragging the items in the list.
When you click a hotspot title in the list, its marker gets selected in the gallery and vice versa. All hotspots belonging to a gallery will appear in the Hotspot Order list even if they don’t fit in the gallery.
Adding and Removing Images
If you know ahead of time which images you want in your gallery, you can zip them all up and import the photos into the gallery all at once. You can also add images to a gallery one at a time by creating new hotspots.
How to add an image to a gallery
- Choose New > Hotspot from the Tour Builder Menu
- On the Edit Hotspot Content screen:
- Choose a Photo Marker from the Marker dropdown
- Choose and load an image
New hotspots that you import or add manually are automatically placed in the gallery if there is enough room.
You can delete images one at a time by deleting the corresponding hotspots.
How to delete multiple images from a gallery
- Choose Gallery > Delete Hotspots from the Tour Builder Menu
- On the Delete Hotspots screen:
- Check the images you want to delete
- Click the Delete button
- On the confirmation dialog, click the DELETE button
Replacing Photo Markers
One of the most common things you’ll find yourself doing with galleries is trying different photo markers to see which one gives you the look you like best. Replacing the photo marker for every image in your gallery is easy.
How to replace the photo marker for every image in a gallery
- Choose Gallery > Replace > Markers from the Tour Builder Menu
- On the Replace Markers screen:
- Choose a new marker from the list
- Click the Check All link
- Click the Replace button (there is no confirmation dialog)
Gallery Size and Shape
When you first create a new gallery, you may find that its initial size (width and height) and shape (square, tall, or wide) might not be what you envisioned. It may take a little bit of trial and error to adjust the gallery to be exactly the size and shape you want.
A good way to start is to first decide exactly how big the gallery should be and then set the tour size and layout accordingly. If you aren’t sure of the exact dimensions, take a first guess and then adjust them later to make the gallery a little bigger or smaller as necessary.
Once your tour size and layout are locked down, you only need to be concerned with how the thumbnails are laid out in the gallery. An easy way to simply fill the gallery left to right and top to bottom is to check both the Auto Row Spacing and Auto Column Spacing options on the Gallery screen. If you need more control over row and column spacing, choose the options you need and then see where adjustments need to be made.
The two problems you will most commonly encounter are that either some hotspots don’t fit, or that there is too much blank space on the right or on the bottom of the gallery area.
Making all the hotspots fit
If all of your hotspots won’t fit, you have three choices:
- Make the gallery wider and/or taller by changing the tour size or layout
- Use less spacing between the rows and/or columns, or use a smaller top and/or left margin
- Use a smaller photo marker
Eliminating blank space on the right or bottom
Once you get all of your hotspots to fit you may still find that you have too much space on the right side or bottom of the gallery. To correct this, you can fine-tune using the same techniques used to make all the hotspots fit: adjust the tour size, the margins and spacing, and the photo marker size.
Gallery Sampler
Below are nine screenshots of galleries that use the same set of photographs. Each sampler demonstrates different gallery layout options and different photo markers. The options used to create each are provided following below the examples.
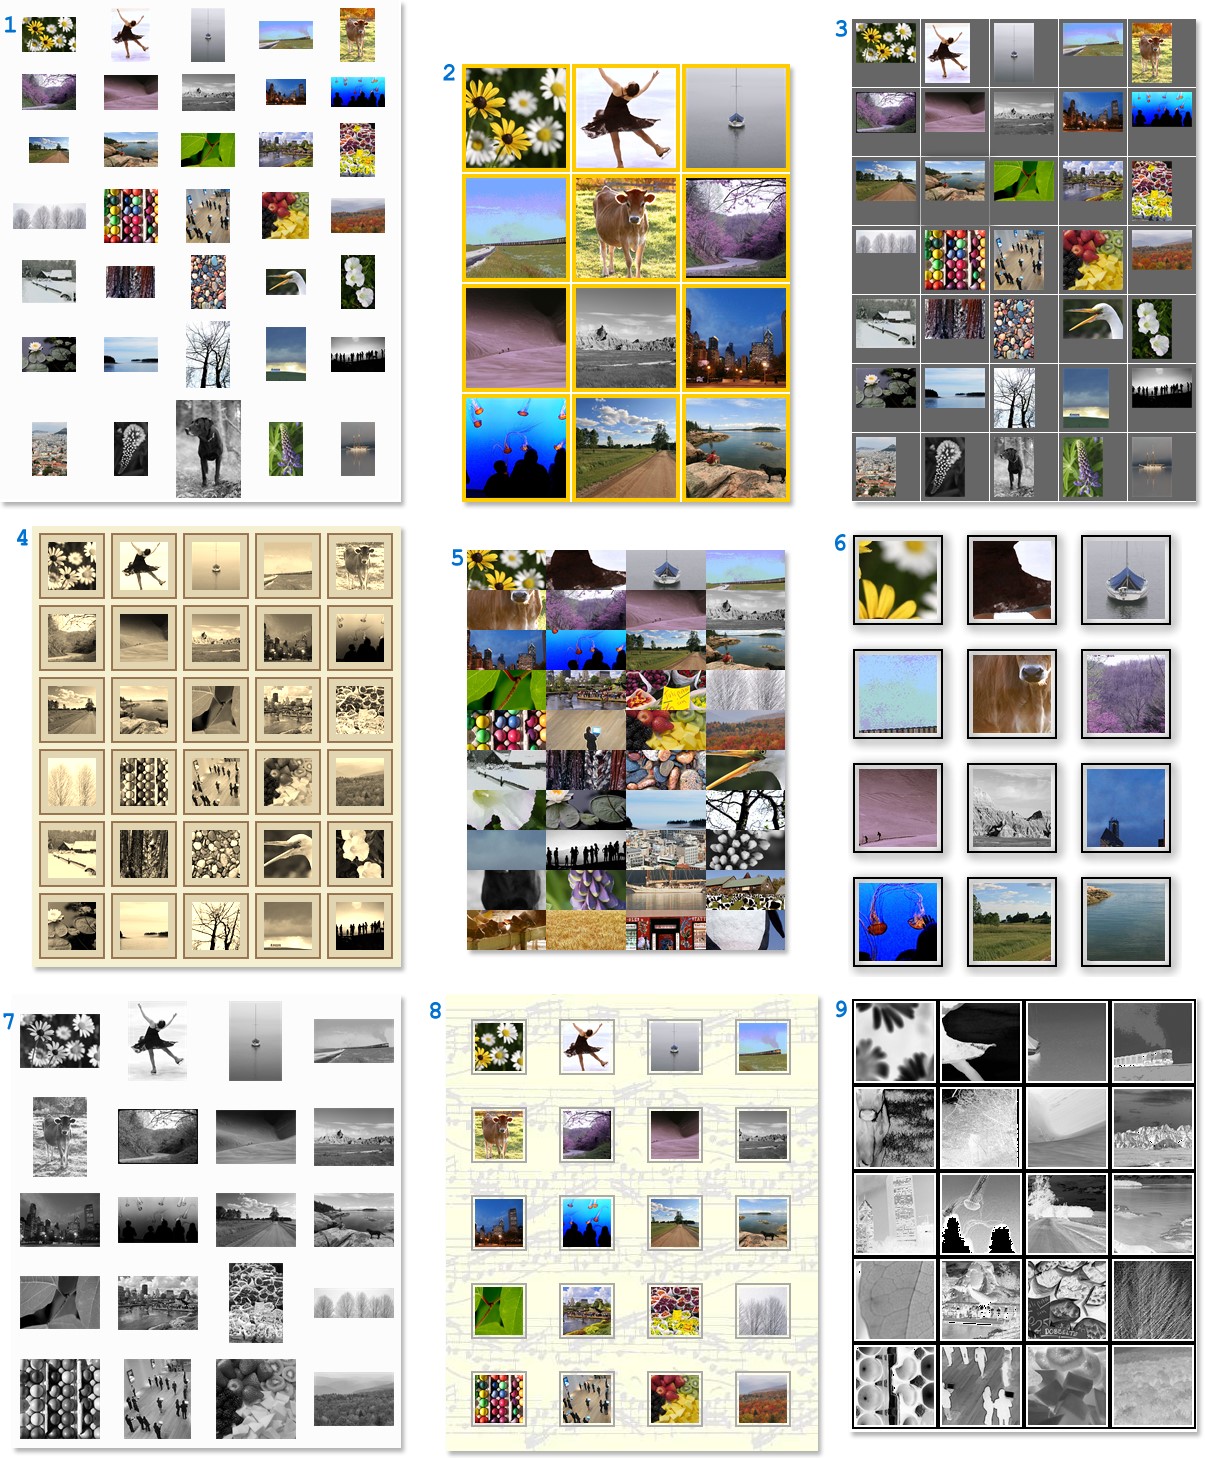
Options used for the gallery screenshots shown above
This section provides a brief explanation of the options that were used to create the gallery screenshots above. The numbered paragraphs below correspond to the blue numbers at the upper left corner of each screenshot.
- The images are uncropped and scaled to 7% of the actual image size so you can tell the relative sizes of the original images. For example, the dog is larger than the ice skater because the dimensions of the dog image are greater than the dimensions of the ice skater image. Each image is centered horizontally and vertically. The photo markers in this example have no normal or selected appearance.
- The images are cropped from their center in 120x120 pixel squares and the photo markers have a 4 pixel gold matte. The markers are separated in the gallery by 1 pixel that lets the white background show through.
- The images are in 60x60 pixel squares and the photo markers have a dark gray fill color. The images are not cropped so you see the entire photo. Wide images are aligned at the top and tall images are aligned at the left. The markers are separated in the gallery by 1 pixel to let the white background show through.
- The images are in 50x50 pixel squares and the photo markers have a 7 pixel beige matte with a 2 pixel dark brown border. They are cropped from the center and the markers use the sepia special effect. The markers are separated in the gallery by 6 pixels that let the light tan background show through.
- The images are in 80x40 pixel rectangles that butt against each other in the gallery. They are cropped from the center with a 2x crop factor.
- The images are in 80x80 pixel squares and the photo markers have a 4 pixel transparent matte with a 2 pixel black border. They are cropped from the center with a 3x crop factor. The markers have a drop shadow and are widely spaced in the gallery.
- The images are uncropped and scaled to fit centered within an 80x80 pixel square with a white fill. The markers use the black and white special effect.
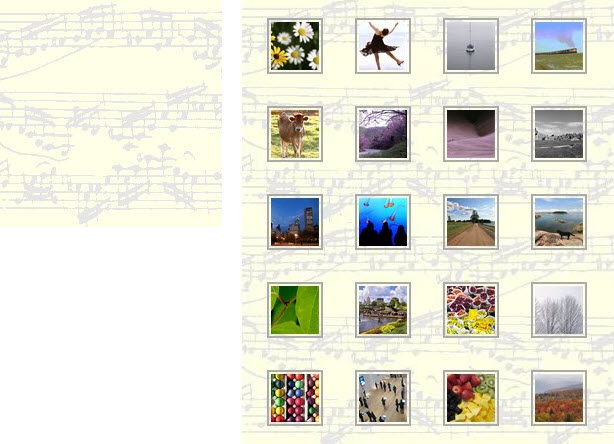
- The images are in 50x50 pixel squares and the photo markers have a 2 pixel white matte with a 2 pixel gray border. They are cropped from the center and are widely spaced in the gallery. This gallery also has a repeating background image of music notes.
- The images are in 80x80 pixel squares and the photo markers have a 2 pixel white matte with a 2 pixel black border. There is no spacing between the images. They are cropped from the right side with a 2x crop factor. The markers use the black and white negative special effect.