Marker Effects
You can add special effects to marker styles to add interest and make your markers stand out. Because effects are part of a marker's style, they can apply to shape markers, text markers, and photo markers, but not to symbol markers which do not use marker styles.
How to add an effect to a marker style
- Choose **Library > Marker Styles** from the Tour Builder menu
- On the **_Marker Style Library_** screen:
        - Click the marker style name in the list
                - On the **_Edit Marker Style_** screen:
                        - Add the effects to the Normal Appearance and Selected Appearance fields
Kinds of Effects
The following effects are supported:
- Blend
- Glow
- Shadow
- Line Dash
Each marker effect takes one or more parameters that specify how the effect will be rendered. Because an effect specification can be used as a single parameter to some API methods, you specify the effect and its parameters as a string enclosed in quotes.
All parameters are optional; however, any parameters that are specified must appear in the correct sequence. If a parameter is provided after a parameter that is omitted, you must include a comma as a placeholder for the omitted parameter.
The effect name is case-insensitive. For example, you can specify "Glow" or "glow".
Blend Effect
The blend effect combines a shape’s line and fill colors with the colors of the underlying map
image. The blend effect is most commonly used to create marker styles that let the underlying map image show beneath the marker.
How the colors blend is controlled by the mode parameter.
Performance
Blending is a very compute-intensive operation. If a map has a lot of markers that use the blend effect, the map may become sluggish. If that happens, reduce the number of markers that use of the blend effect or eliminate its use altogether.
- mode
- A mode name that indicates what effect the blend will have. The default mode is multiply. A brief explanation of each mode follows.
| Mode | Description |
|---|---|
| darken | Replaces only the areas that are lighter than the blend color. Areas darker than the blend color don’t change. |
| difference | Subtracts either the blend color from the base color or the base color from the blend color, depending on which has the greater brightness value. The effect is similar to a color negative. |
| hardlight | Multiplies or screens the colors, depending on the blend mode color. The effect is similar to shining a spotlight on the object. |
| lighten | Replaces only pixels that are darker than the blend color. Areas lighter than the blend color don’t change. |
| multiply | Multiplies the base color by the blend color, resulting in darker colors. |
| normal | Applies color normally, with no interaction with the base colors. |
| overlay | Multiplies or screens the colors, depending on the base colors. |
| screen | Multiplies the inverse of the blend color by the base color, resulting in a bleaching effect. |
Perhaps the most useful blend mode is multiply. Without the multiply effect, a shape’s fill color will tend to wash out the underlying map image, especially text. By using the multiply effect, the shape can highlight and enhance an area of the map image without negatively affecting the map image.
In the image below, all three circles have the same fill color #ffcf00, but each alters the appearance of the map in a different way. The first circle has 100% fill color opacity without blend. The second circle has 70% opacity without blend. The third circle has 70% opacity with blend multiply. The fourth circle has 100% opacity with blend multiply.
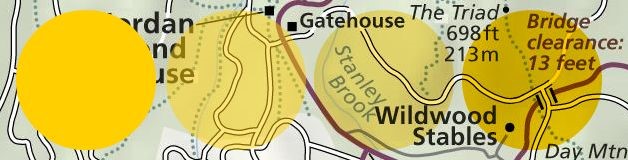
The blend effect will work with text markers, but the shape’s fill color opacity must be 99% or less. If the opacity is 100%, the text marker will have an opaque background even with the blend effect.
Examples
"blend"
"blend,multiple"
Glow Effect
The glow effect adds a glow to the outside of a shape to help it stand out more from the underlying map image.
- color
- The color of the glow. The default value is the shape’s line color (even if the line thickness is zero and/or the line’s opacity is zero).
- opacity
- The opacity value for the color. Valid values are 0 to 100. The default value is 50. Note that the base opacity of the glow itself is the opacity of the shape and therefore the shape and/or its line must be visible for the glow to be visible. If the shape and its line are both transparent, there will be no glow.
- blurX
- The amount of horizontal blur. Valid values are 0 to 255. The default value is 10. Directional blur is not supported when the map is rendered in HTML5 – the average of blurX and blurY is used instead.
- blurY
- The amount of vertical blur. Valid values are 0 to 255. The default value is 10. Directional blur is not supported when the map is rendered in HTML5 – the average of blurX and blurY is used instead.
Examples
"glow"
"glow,,50"
"glow,0x00ff00,50,4,4"
Tip: if you want a glow around a shape, but want the shape to be invisible, set the shape’s fill color to white, 100% opacity, with no line thickness. You can also use the blend effect with multiply mode to cause the shape to blend with the background.
Shadow Effect
The shadow effect adds a drop shadow to a shape to help it stand out more from the underlying map image.
- distance
- The offset distance for the shadow, in pixels. The default value is 4.
- angle
- The angle of the shadow. Valid values are 0 to 360 degrees. The default value is 45. To give you a feel for the angle, when zero the shadow appears as if the light is coming from the left side of the marker. An angle of 45 makes the light appear to come from the upper left corner of the marker. An angle of 270 makes the light appear to come from the top of the marker.
- color
- The color of the shadow. The default value is 0x000000.
- opacity
- The opacity value for the shadow color. Valid values are 0 to 100. The default value is 40. Note that the base opacity of the shadow itself is the opacity of the shape and therefore the shape and/or its line must be visible for the shadow to be visible. If the shape and its line are both transparent, there will be no shadow.
- blurX
- The amount of horizontal blur. Valid values are 0 to 255. The default value is 10. Directional blur is not supported when the map is rendered in HTML5 – the average of blurX and blurY is used instead.
- blurY
- The amount of vertical blur. Valid values are 0 to 255. The default value is 10. Directional blur is not supported when the map is rendered in HTML5 – the average of blurX and blurY is used instead.
Example
"shadow,5,135,0x748b5d,60,7,7"
Line Dash Effect
The linedash effect sets the line dash pattern used for a shape’s lines.
The line dash effect may not work as expected when using the drawRoutes method to draw routes that partially overlap each other. Where the routes overlap, the pattern for one route may be offset from the pattern for another which will result in a combination of the two patters or possibly a solid line. To avoid this problem, use a solid line for overlapping routes.
- segments
- A comma-separated list of numbers that specify distances to alternately draw a line and a gap.
Examples
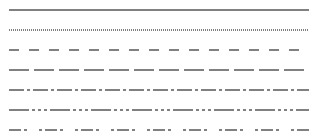
The linedash settings that follow produce the results shown below.
"linedash" (the default, produces a solid line)
"linedash,1,1"
"linedash,10,10"
"linedash,20,5"
"linedash,15,3,3,3"
"linedash, 20,3,3,3,3,3,3,3"
"linedash,12,3,3"
Results
Effect Combinations
You can combine more than one effect into an effect string by separating each effect with a semicolon.
For example, you can specify "blend,multiple;shadow" to combine the blend and shadow effects.
The glow and shadow effects are mutually exclusive and so it makes no sense to combine them. If you use both, only the shadow effect will apply.
Examples
"blend,multiple;glow,0x00ff00,50,4,4"