Markers
A marker is a symbol or a shape that has size and appearance that determine how big a hotspot is and what it looks like. Some markers may be unique to one hotspot and others may be used by many hotspots.
MapsAlive supports five kinds of markers.
The sections below describe the general characteristics of markers and how to work with them. For information about specific kinds of markers, see the individual marker pages above.
Marker Appearance
Markers don’t have data or behavior, but they have two appearances – normal appearance and selected appearance. The normal appearance is what the marker looks like on the map when the hotspot has not been selected by mousing over, touching, or clicking it. The selected appearance is what the marker looks like when the hotspot is selected by mousing over, touching, or clicking it.
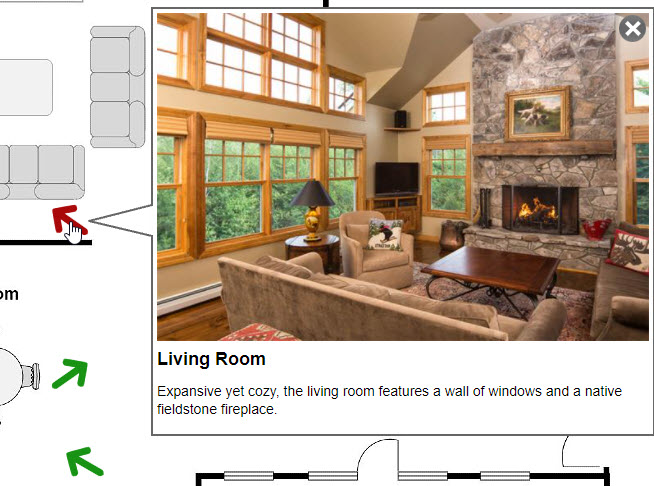
For example, the floor plan below shows three arrow markers. The normal appearance of the marker is green and the selected appearance of the marker is red. The Living Room hotspot is selected because the mouse is over its marker so the marker shows its red selected appearance. Note that a marker’s normal or selected appearance can be invisible in which case the marker is only used to designate the hotspot’s size and shape.
Working with Markers
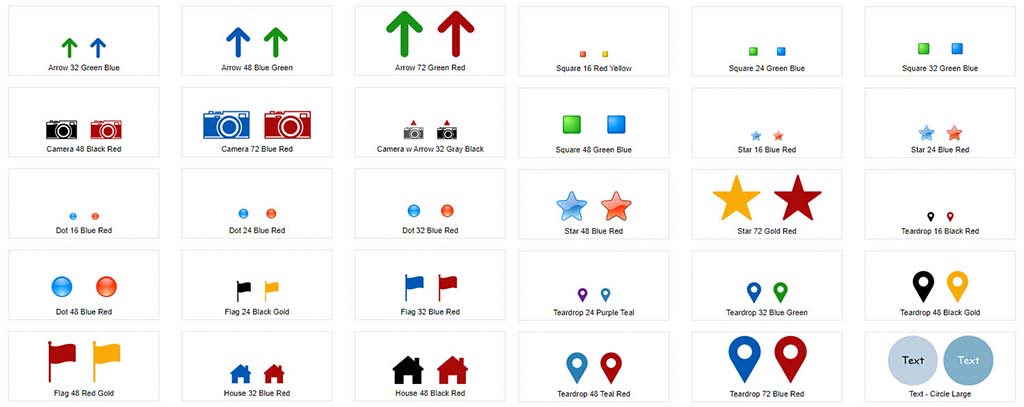
MapsAlive comes with a variety of built-in markers or you can also create your own. Below are some of the markers that come with MapsAlive:
When you create a new hotspot, the hotspot is automatically assigned the last marker you used (or the default marker for your MapsAlive account). You can choose a different marker for a hotspot on the Edit Hotspot Content screen.
How to set a marker for a hotspot
- Choose Hotspot > Edit Hotspot Content from the Tour Builder menu
- On the Edit Hotspot Content screen
- Choose a marker name from the Marker dropdown
How to place a hotspot on a map
See How to place a hotspot on the map in the Hotspot Content section
How to replace multiple markers at once
- Choose Map > Replace > Markers or Styles > Markers from the Tour Builder menu
- On the Replace Markers screen:
- Choose a new marker from the New Marker dropdown
- Check the box next to the hotspots for which you want to replace the marker
- Click Replace
The Replace Markers feature is included in the Plus and Pro Plans.
How to preview a marker on the Edit Marker screen
- Choose Library > Markers from the Tour Builder menu
- On the Marker Library screen:
- Click the name or image of the marker you want to preview
- On the Edit Marker screen:
- If you have modified the marker, click Save
- Move your mouse over and off the marker in the preview area in the upper right
Creating and Editing Markers
An easy way to create a new marker is to duplicate an existing marker and make changes to it.
When you edit a marker any changes you make are applied to all of the hotspots in all of your tours that use that marker. For this reason you may want to duplicate the existing marker before making changes. This way the original marker does not change and other hotspots are not affected. When you are happy with your changes, you can assign the new marker to the hotspots you want to use the new marker.
How to create a new marker
- Choose New > Resource > Marker from the Tour Builder menu
For more information about creating specific kinds of markers, see the individual marker pages.
How to edit a marker
- Choose Library > Markers from the Tour Builder menu
- On the Marker Library screen:
- Click the name or image of the marker you want to edit
You can also edit a hotspot's marker directly by clicking the Edit link next to the Marker dropdown on the Edit Hotspot Content screen.
How to duplicate a marker
Making a copy is a good way to customize a marker without modifying the original.
- Choose Library > Markers from the Tour Builder menu
- On the Marker Library screen:
- Click the name or image of the marker you want to duplicate
- Choose Library > Duplicate from the menu
How to delete a marker
- Choose Library > Markers from the Tour Builder menu
- On the Marker Library screen:
- Click the name or image of the marker you want to delete
- Choose Library > Delete from the menu
You cannot delete a marker that is used by any hotspots in your account.
Other Marker Tasks
How to see which hotspots are using a marker
- Choose Library > Markers from the Tour Builder menu
- On the Marker Library screen:
- Click Show Details View
- The details view displays the number of uses to the left of the marker preview, or "Not used"
- Click the link to see which hotspots are using the marker
How to see all the markers in your MapsAlive account
- Choose Library > Markers from the Tour Builder menu
How to filter markers to see only the ones used by the current tour
- Choose Library > Markers from the Tour Builder menu
- Then, choose Library > Filter Markers from the menu
Uncheck Filter Markers to stop filtering. Also, note that bound markers only appear on the Marker Library screen when you choose to filter markers.
How to delete all unused markers from your account
- Choose Library > Markers from the Tour Builder menu
- On the Marker Library screen:
- Choose Library > Delete Unused Markers
This will delete all markers that are not used by any hotspots.
How to set the default marker
- Choose Account > Preferences from the Tour Builder menu
- On the Preferences screen:
- Choose a marker from the Default Marker dropdown