Hotspots
This section provides information about how to work with hotspots. For other hotspot-related topics, see:
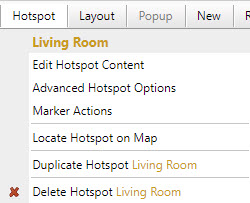
You initiate most hotspot-related tasks from the Tour Builder's Hotspot menu (click below to see the menu).
Hotspot menu

Hotspot Terminology
- Hotspot
- A hotspot is an important location on your map that you want users to interact with. A hotspot itself has no size or appearance, but every hotspot has a marker associated with it. Hotspots usually have content - images, text, or multimedia - that displays when you mouse over or touch the markers on the map. A hotspot can also perform an action, such as linking to a web page, when you mouse over, touch, or click its marker.
- Hotspot Marker
- A hotspot marker defines the size and appearance of hotspots. Markers are placed on the map to show hotspot locations. Every hotspot has one marker, but a marker can be used by many hotspots. Learn more about markers.
- Hotspot Content
- A hotspot can have text, images, and multimedia information associated with it as explained in the Hotspot Content section below.
- Hotspot Content Editor
- You add and edit a hotspot's content using the Hotspot Content Editor.
Working with Hotspots
How to add a new hotspot
![]()
- Click the add hotspot icon (see red arrow above) or choose New > Hotspot from the Tour Builder menu
- The Edit Hotspot Content screen displays for the new hotspot
Tip: You can click the add hotspot icon multiple times to quickly create several hotspots.
How to set the first hotspot that displays when a map loads
- Choose Map > Map Setup from the menu
- On the Map Setup screen:
- Choose the hotspot from the First Hotspot dropdown
How to delete a hotspot
- Select the hotspot from the Tour Navigator on the left
- Choose Hotspot > Delete from the Tour Builder menu
- Click the DELETE button on the confirmation dialog
Caution
A deleted hotspot cannot be recovered. It is permanently removed from our database and cannot be restored.
How to delete multiple hotspots at the same time
To delete hotspots from a map:
- Choose Map > Delete Hotspots from the Tour Builder menu
To delete hotspots from a gallery:
- Choose Gallery > Delete Hotspots from the Tour Builder menu
Then, on the Delete Hotspots screen:
- Check the hotspots you want to delete
- Click the Delete button
- Click the DELETE button on the confirmation dialog
Caution
Deleted hotspots cannot be recovered. They are permanently removed from our database and cannot be restored.
How to edit a hotspot
- Choose Hotspot > Edit Hotspot Content from the Tour Builder menu
How to place a hotspot on the map
There are three ways to place a hotspot on the map:
-
From the Edit Hotspot Content screen:
- Click Place this hotspot on the map
-
From the Map Editor screen:
- Click the hotspot's thumbnail in the Hotspot Thumbnails section that appears below the map
-
From the Map Editor screen:
- Choose the hotspot's title from the hotspot dropdown list

Hotspot Dropdown List
How to find a hotspot on the map
There are three ways to locate a hotspot on the map:
-
From the Edit Hotspot Content screen:
- Click Locate this hotspot on the map
-
From the Map Editor screen
- Click the hotspot's thumbnail in the Hotspot Thumbnails section that appears below the map
-
From the Map Editor screen
- Choose the hotspot's title from the hotspot dropdown list

How to display a video, web page, or Google map in a hotspot's content
You can embed a video, HTML document or web page, or Google map in your hotspot content by pasting the HTML embed code directly into your hotspot’s content.
- Choose Hotspot > Edit Hotspot Content from the Tour Builder menu
- On the Edit Hotspot Content screen:
- Choose Multimedia from the Media dropdown. This step changes the hotspot content type from Photo to Multimedia and displays the Multimedia field. Note that changing the hotspot type to Multimedia removes the hotspot's photo if any.
- Paste the HTML embed code for your video or other multimedia into the Multimedia field and choose Save
Videos must already be hosted on a server somewhere such as YouTube or your own server. You cannot upload a video directly to MapsAlive. You can paste HTML for one
<iframe>or one<video>tag. You cannot use any other HTML tags in the Multimedia field and you can only include one complete tag per hotspot. Any HTML that appears after the closing tag for one of the supported tags is automatically truncated.
How to edit the HTML for a hotspot's text content
- Choose Hotspot > Edit Hotspot Content from the Tour Builder menu
- On the Edit Hotspot Content screen:
- Click the Source code icon
<>on the right of the Text editor menu - Edit your HTML and click Save
- Click the Source code icon
How to set a hotspot's id
- Choose Hotspot > Edit Hotspot Content in the Tour Builder menu
- On the Edit Hotspot Content screen:
- Type the new id in the Hotspot Id field
Hotspot Content
A hotspot can have these types of content:
- Title
- Image or Multimedia
- Text or HTML
- Tooltip
You can manually add and edit content using the Hotspot Content Editor described below. You can also import content from a file and export content to a file. A common technique for updating content for many hotspots is to export your tour's hotspot content to a CSV file, edit it using Excel, and then import it back into the tour.
Hotspot content can be displayed in popups or in a tiled page layout alongside the map. If your tour has more than one map or gallery you can choose a different layout for each page.
Media Content
A hotspot can have a single image or a single multimedia object such as a video. You upload a hotspot's image from a file on your computer. You add a multimedia object by pasting its embed code.
Though a hotspot can have only one image or one multimedia object, it is possible to have more than one of either or both by using HTML for the hotspot's text content. To learn more, see the HTML Hotspot Content section below.
Text Content
A hotspot can have text which can be plain or formatted. You format text using the various menu and toolbar options in the Hotspot Content Editor. A hotspot's text content can also be HTML. To learn more, see the HTML Hotspot Content section below.
Hotspot Content Editor
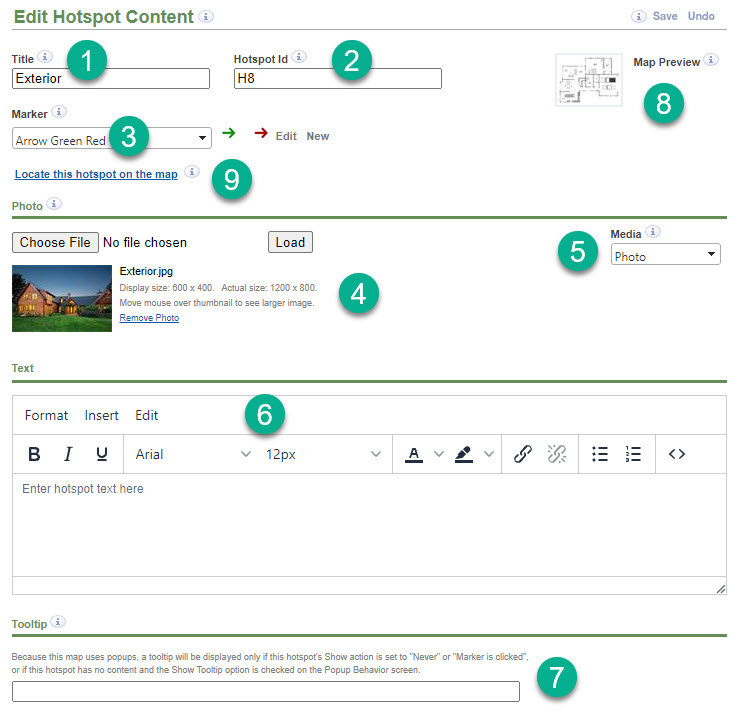
You edit the content for individual hotspots on the Edit Hotspot Content screen shown below. You get to this screen by choosing Hotspot > Edit Hotspot Content from the Tour Builder menu.

The fields on the Edit Hotspot Content screen are described below:
-
Hotspot Title - identifies the hotspot in the Tour Navigator.
-
Hotspot Id - a unique identifier. You can keep the default value or use your own.
-
Marker - lets you choose the marker for the hotspot
-
Photo and Media area - lets you upload an image for the hotspot or paste your HTML embed code for multimedia. The example shows an uploaded image.
-
Media selector - lets you choose to display a photo or multimedia. If you choose multimedia, any photo associated with the hotspot is removed and you will be able to paste your HTML embed code into a text box.
-
Text editor - lets you enter fully formatted text quickly and easily. You can create bulleted and numbered lists, add links, choose fonts and font sizes, and set text and background colors.
-
Tooltip - let you type tooltip text for this hotspot.
-
Map Preview - mouse over the thumbnail image to see a larger image of the map.
-
Place/Locate this hotspot on the map - click this link to go to the Map Editor with this hotspot selected. If the hotspot is not on the map, you can add it to the map by clicking the link.
HTML Hotspot Content
A hotspot's text can be HTML which means that a hotspot can display practically anything.
The most common way to create the HTML for a hotspot's content is to simply use the menu and toolbar options in the Text Editor section of the Hotspot Content Editor. Those options let you do things like make text bold or give it a color, create a bullet list, or insert a hyperlink. The editor automatically creates the HTML for this kind of formatting.
Another use for HTML is to get around the limitation that a hotspot can have only one image. To learn more, see the section below on displaying multiple images.
A hotspot's text content is also used for the HTML that comes from a Live Data request. Because Live Data content is obtained dynamically from a server, you'll never see it in the Hotspot Content Editor, but it gets displayed as if you had typed it in.
Using HTML to display images
The simplest way to display an image for a hotspot is to upload it in the Photo section of the Hotspot Content Editor. That way MapsAlive knows the image's dimensions. MapsAlive uses this knowledge in determining the size of a popup or mobile slideout. However, you can't upload the image in the following cases:
- The image is in an
<img>tag coming from Live Data HTML - The image is on the web and you are referencing it by its Image URL
- The image belongs to another hotspot and you are inserting it using the image macro
In the cases above MapsAlive does not know the image dimensions and so you need to do the following to help ensure that that the image displays correctly in popups and slideouts:
-
Specify the dimensions of each image, both width and height
Be sure the dimensions are consistent with the image's aspect ratio, otherwise, the image's height or width will appear to be stretched. An example appears below for a square image:
<img src='https://livedata.mapsalive.com/images/employees/1007.jpg' width='200px' height='200px'> -
Provide CSS
In addition to coding
widthandheighton the<img>tag or in the image macro, you should provide CSS that setsmax-widthand overrides the image'sheightwithauto. It's also a good idea to setvertical-aligntomiddleto remove the space that browsers leave below an the image the same way they do for text with characters that have descenders like the lettersj,p, andg.img { max-width: 100%; height: auto; vertical-align: middle; }This CSS is necessary when the image needs to be displayed in a popup or slideout at a size smaller than what you specified for
widthandheight, such as when a popup is scaled to fit in a small browser area or on a mobile device. Settingmax-widthprevents the image from displaying too wide and settingheighttoautoautomatically adjusts the height to match the width while preserving the image's aspect ratio.In the example,
max-widthis100%but you might need a smaller percentage if the image should not take up the full width of the available space. An example of such a case appears at the bottom of this page.
Displaying multiple Images
The Edit Hotspot Content screen only lets you upload one photo per hotspot, but there are two different ways to work around that limitation:
- Insert image URLs into the hotspot's text area
- Use the image macro to insert images from other hotspots in the tour
Image URL
If your images are available on the web and you can reference them by URL, you can insert their URLs into the text area this way:
-
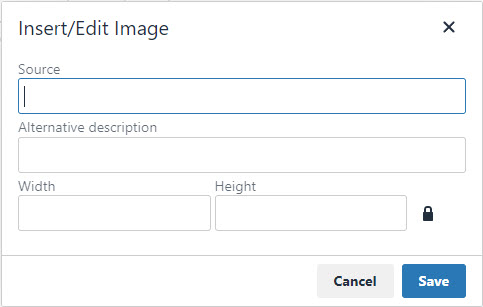
Choose Insert > Image from the text editor's menu as shown below. The Insert/Edit Image dialog will appear.

-
Type the image's URL into the dialog along with dimensions to specify the size at which you want the image to display. If you don't specify the dimensions, the image will appear at its full size. Be sure the dimensions you provide are consistent with the image's aspect ratio, otherwise, the image's height or width will appear to be stretched.

-
The image will display in the text editor. Repeat this process for each image you want to display.
To change the URL or dimensions of an image that you have already inserted:
- Select the image in the text editor by clicking it
- Choose Insert > Image again to redisplay the dialog
Image macro
If your images are not available on the web, you can use the image macro to insert images from other hotspots in your tour. The image macro is special syntax (image-macro) that you type into one hotspot's text area to refer to an image that belongs to another hotspot in the tour. An example is shown below.
[image-macro hotspot-id:h1; width:150; height:100]
To make use of the macro, you add other hotspots, each with an image, as a way of creating a set of images that you can combine into a single hotspot using the macro. The other hotspots don't ever need to be placed on a map, though they can be. The other hotspots do, however, count as hotspots in your account whether or not you place them on a map.
The hotspots you use with the image macro must belong to a map having a template that contains a media area, otherwise, the Tour Builder won't generate the image. A workaround is to create a separate map that does have a media area and use it just for image macro hotspots. You can exclude the map's page from your tour's navigation so that no one will see it.
The syntax of the image-macro is:
[image-macro hotspot-id:id; map-id:id; width:number; height:number]
The table below explains the parameters. Notice that each parameter is a name/value pair followed by a semicolon. The set of parameters are enclosed in square brackets. All of the parameters except for hotspot-id are optional.
| Parameter | Description |
|---|---|
| hotspot-id | The id of the hotspot whose image you want to include in this hotspot's text area. |
| map-Id | The id of a map in the same tour that contains a hotspot with the image you want to include. This parameter is only required if the hotspot is on a different map. |
| width | Specifies how wide you want the image to display in pixels (optional but strongly recommended). It's okay to add px after the number, but it's not necessary. If you don't specify the width, the image's full width will be used. |
| height | Specifies how high you want the image to display in pixels (optional but strongly recommended). It's okay to add px after the number, but it's not necessary. If you don't specify the height, the image's full height will be used. |
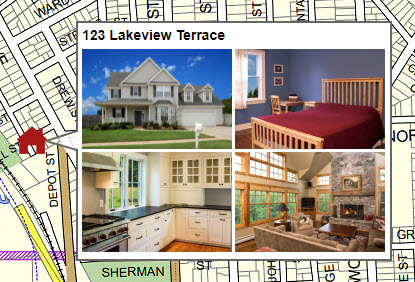
The example below shows the image macro used to create a 2x2 arrangement of images from hotspots h1, h2, h3, and h4.

The popup below shows the result of using the image macro as shown in the example above.

To ensure that the images display correctly in a popup or slideout where there is not enough width to display the images at their full size, use the CSS shown below.
#maHotspotText img,
#maPopupText img {
   max-width:49%;
   height:auto;
}
The CSS above ensures that each image will use just under half of the available width of the popup or slideout. The percentage is 49 instead of 50 to account for the vertical spacing between the images. Without this CSS, if the popup is narrower than around 300px the images will display in a column, not side by side, at the specified width of 150px.